Monday, June 29, 2020

Sewing In the Car

You may or may not be aware that DH and I are currently away on vacation. But a sewist doesn't just stop sewing, most of the time anyway. I brought along some hand stitching and have made a bit of progress since Wednesday.


 I am stitching periwinkle blocks using fabrics I got in 2019 while on vacation in Key West, thus my name for this quilt will be Key West Quilt. Original, huh? I wrote about prepping this project here.

My original thought was to mix up all the fabrics in each block. However, I don't have very much variety, so every block would end up being practically the same. I decided to make blocks that contain the same central fabric, and I like this look. I have made a grand total of six blocks! Whoa!
Not very many, but we have had so many great sights to see. I need to soak in all the beauty of the American West!

My first block; mixed look.

Subsequent blocks, uniform look.
The lighting in these photos is lousy. I'm not good with lighting in normal conditions, but put me in a motel room and I can get some really awful lighting! *hah!*

I am, however, loving that a circle forms when the four blocks come together. This quilt will have lots of movement.

Our vacation has been a smashing success thus far. We have traveled over 3300 miles, and we are just now beginning to head back toward home. We have been in ten states so far from Ohio to California. Our return trip will take us to Montana to see cousins. We hope to be home by Friday.

Don't worry that I am broadcasting the fact that we are away from home. We left the house in good hands, as a close friend is staying with our kitty and keeping the plants watered, the mail gathered and the birds fed.

Hope you are getting some stitching done!
Happy Quilting, Friends!


Saturday, June 27, 2020

Big Rock; Big Move

While the Mennonite neighbors had their various pieces of equipment here for the sidewalk and driveway apron project, I asked them if they would move a rock for me. Harlan was the lead man on the job and while the one day that the cement was poured required assistance from three other men, Harlan returned a couple more times to do the finishing. So it fell to him to take on the new task.

Crazy lady wants a rock in her yard.

I imagine the notion seemed quite ridiculous to him, but he was willing to give it a try.

A try? Well, you see this rock was lodged into the bank of a stream near our house. I did a bit of research on the ice age as it affected the region that is now Ohio, and it is entirely possible that this rock was deposited in this stream by the Illinoian glacier about 300,000 years ago. Of the four glaciers believed to have impacted our region, this is the glacier that advanced the farthest south.

So, yeah, moving this rock - or perhaps more accurately this boulder - would require a bit of an effort. After I'd shown Harlan the rock I had my eye on, I suspect that it became a personal challenge to see if he could do it. Or perhaps he was skeptical that his skid loader was up to the task. After all, we only saw a portion of the rock and had no idea how much was underground.

I may have missed the best part of the process, for when Harlan came back to deal with the boulder, I did not get outside in time to see him digging it out of the stream bed. I sure wish I had, though. DH watched, and according to him, Harlan had his hands full with maneuvering the loader, dealing with the incline of the stream bed, wrapping the chain around the boulder to assist in pulling it out, and then wedging the boulder into the bucket.

Here's the part I did get to see.

Harlan hauls the boulder into the yard.


He releases the chain. This damp-looking part was underground.


He dumps it out and backs away. This was the part above ground.

Our ice-age boulder.

Note the striations, that vertical gash on the left, and the lichen.

A closer look at the lichen and striations.


I wish I'd gotten a close-up picture of Harlan's face as he dumped that boulder into the yard. It was priceless! His eyes and grin revealed how incredibly impressed he was that he had actually conquered the massive move. He was so self-contained in his satisfaction, yet his look spoke volumes - he was like a kid who'd caught the giant fish. This boulder may get a little bigger in the repeated telling of the story.  No doubt this will be an oft-repeated tale as he sees friends and family in the coming days and weeks.

And how big is it, you ask? Well, Harlan has a good bit of experience moving, lifting and loading and knows what his machine can handle. He estimated that the boulder weighs more than 3500 pounds, possibly as much as 4000 pounds. Impressive, for sure.

Our next step in creating this garden vignette is to outline the space, dig out the turf, and add some topsoil and mulch. We intend to erect a flagpole for an American flag kit we got last year, as well as plant a few flowers - preferably some that will add color from spring through fall. I'm thinking tulips for spring, coreopsis for summer blooms, sedum for fall, and a hosta or pampas grass for year-round interest.

Fun projects keep presenting themselves, and we tackle them as we can. This boulder thing has been in our plans for a long time, and was totally worth the wait.

Happy Quilting, Friends!


Thursday, June 25, 2020

Home Improvements

After nearly 28 years of living with a gravel driveway up to our garage door, we at last have a concrete apron. We have long wanted to do this, and finally this spring we accomplished our goal. Along with that apron, we replaced our front sidewalk and improved the step access to the screened porch. Let's take a walk through this home improvement.

Step 1: Remove old sidewalk

We have had this brick sidewalk for over 20 years, and ever spring and summer we battle weeds that grow in the cracks. It becomes quite unsightly. These pictures were taken in early April, and the weeds were already becoming a nuisance.


This picture shows the area after all the bricks had been removed. Now that was a job! Fortunately, our son was home during the pandemic and he did nearly all of this for us.

Step 2: Lay out new sidewalk, remove excess gravel, and build forms.

Steps 2 and 3 occurred on consecutive days - a Monday and a Tuesday.  This particular day only Harlan and his helper/brother-in-law Eldon were here to build the forms and clear away the gravel. Eldon's wife (and Harlan's sister) Elma brought the men their lunches, and we got to visit a little bit.

Side note: This Mennonite community surrounds us and we have gotten to know them pretty well. DH drives the school van for them (they are a horse-and-buggy community); I occasionally take another sister or two to work in Frankfort, and we buy produce and eggs from other family members.


Step 3: Concrete Day!!

Cement delivery was scheduled for early on a Tuesday, so the Mennonite crew was here even earlier to do the final prepping. Harlan and his crew - Eldon, Ervin, and Harvey - were very efficient workers. They worked steadily even through the heat and sun with few, if any, breaks. Once that truck arrived, however, the pace picked up to a frenetic, strenuous level.This is back-breaking work! Concrete installation requires work to be done quickly, before hardening begins. The precision with which each man performed his duties in this process was something to watch. Almost like a conductor of a symphony, Harlan had his men right where they needed to be, anticipating each move and need. I was impressed by the entire process.


Have you noticed the skies? We really got lucky with the weather. These were two very gorgeous days.

Step 4: Finishing, Sealing and Clean-up

These steps occurred over 2 or 3 days, and clean-up continues even now, over a week later. We still have topsoil to fill in around the newly poured concrete, but we are able to use the sidewalks and park vehicles on the apron. Totally worth the 28-year wait. Shoulda' done it sooner.


So that's our big outdoor home improvement. Here in a day or two, I will share the "extra" job that Harlan did for us before he took all his heavy equipment away.

Hope you are having a productive day!
Happy Quilting, Friends!

Tuesday, June 23, 2020

Star Block Tutorial

Back a few weeks ago I finished a quilt I called Larkspur Stars made with my stash of Larkspur fabrics. I did not have a pattern, and did what I seem to do more often than not - I made something up.

Go figure.

Here's the quilt, in case you missed it. And here is a link you can click back on.


I had some interest from a couple of readers about making the stars for this quilt, the sizes and so forth. This tutorial will answer those questions. (The setting blocks are pretty basic stepping stones blocks, and can be easily found in most any quilt pattern book.)

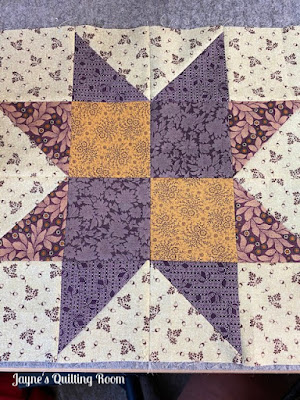
This star block measures 12"  - which means you won't have to make too many in order to have enough for a quilt, especially if you use setting blocks.

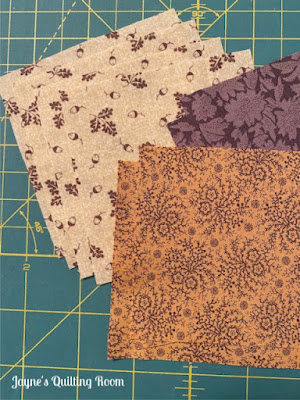
With my Larkspur stars, I wanted to be as random as could be with all the prints, both feature prints and background prints. I had one charm pack and a few fat quarters from which to make the stars. My goal was as little waste as possible - but, I try for that goal with about all my quilts, honestly.

Here is my sketch for the block. The essential numbers to remember are scribbled around the drawing.


For the solid square units, cut 4 for your center at 3.5".
Cut 4 squares of background at 3.5".


For the HSTs, cut 4 colors at 3 7/8" and 4 background at 3 7/8".

Place one color and one background right sides together , draw a diagonal line. Stitch a quarter inch on either side of the line, cut, trim, press.  These HSTs should be right at 3.5", but just in case, trim if necessary. It makes a big difference, so I take the time to do this.


At this point, I lay out my block to see how it looks. If I want more variety in my color placement, this is the time to change things out. For my demonstration star, I am using just a few purple fabrics, so I am not concerned with variety.


Now, the sub-units are prepared, and we move on to constructing the block. I typically would approach this with a chain-piecing mentality. Sew column 1 to column 2, then add column 3, then add column 4. However, I found that I more frequently ended up with sloppy intersections, so I moved to a different method which I now prefer. Make each quarter-block unit, shown below.


After pressing, I lay them out again to be sure all color placement is correct.  I now attach the two top pieces, paying very close attention to pinning my intersection where the HSTs meet. Do likewise with the bottom two pieces.


Yes, I am a pinner. I want my points to come out as near-perfect as possible. I don't always achieve this, but I am achieving it more frequently with this construction method.


I line those seams up as perfectly as possible. I check the intersections of the two HSTs. I pin on each side of the intersection to eliminate unwanted moving or slipping. Like I said, most of the time I get it right; not all. The next two pictures illustrate this point for me.
Spot on!!

Ehhh, not so much.

I left it. It might have warranted another try, but I am not too bothered. It won't be visible in the midst of a big quilt, right?


The rest is self-explanatory - sew the top half to the bottom half. Again, take care to pin where those HSTs meet. I take the time to pin the center intersection, also. I want this right! Pin!


There you have it. My Larkspur star block. As I look at these two side intersections, I am pretty happy. I got 3 of 4 pretty darn perfect. Scroll back up to the top to inspect the block using the Larkspur fabric. Those intersections look alright, too.

I hope this is helpful for you. Let me know if you have good luck with making this star. It is definitely an easy one, no doubt. I might go on from here with this block and see what I end up with. Who knows!?

Happy Quilting, Friends!