
Showing posts with label Dreamy Stars. Show all posts

Monday, February 26, 2024

Quilts on Moonrise Lane

You all know full well that I am still making 9-patch blocks with my 1.5-inch scraps. I estimated in the last post that I thought I could get at least 100 more out of the remaining bits. And I am halfway there. Since that post, I've made roughly 50 more blocks, and it looks like I will exceed my earlier estimate. I still have a lot of pieces left, so I will likely get more than the 100 I figured on.

In an attempt to keep some semblance of regular posting, I thought you might be interested in seeing the quilts that are staying here in Florida with us. We have two bedrooms each decked out with quilts, of course. 

In the master bedroom, I have the only true king-sized quilt I've made all the way to completion. It's a Thimbleberries pattern called Snowflakes, as I recall. I call my version Snowflakes at Dusk because of the gray tones used in the background fabrics. I know snowflakes don't really belong here in Florida, but the quilt is pretty, regardless of it's wintry name. 

An interesting additional note on Snowflakes at Dusk: it is the first one I pieced upon my retirement in 2009. I had no idea then that I would ever become a snowbird.

In the guest room, I have the more recently made Spring Dreams. Sharon and I did a sew-along in 2022 using this pattern. It is fitting, then, that the first guest we will have here in the Moonrise guest room is Sharon! Yes, a scheduled visit here this month had to be rearranged for next month. 

Don't you love how well the newly painted night stand matches the fabrics used in Spring Dreams? It was a total accident, but how nice to have it look as if it were planned. Sometimes plain dumb luck wins out.

I do have one additional quilt that resides here. It generally resides across the foot of our bed. I will retrieve a pic from the way-back files to show which one. We have some pretty cool nights here, so an extra layer of quilt is necessary.

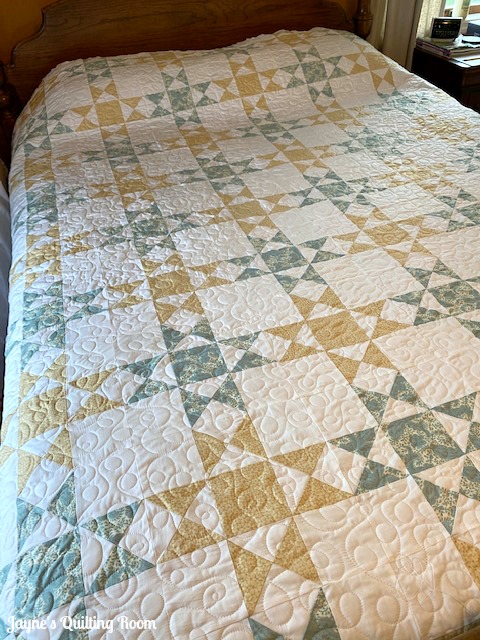
Dreamy Stars is a quilt I made and quilted in May of 2020. Yes, you read that right - made AND quilted all in the same month. A first. I'd long wanted to use these two soft-colored fabrics together, and Ohio Stars are always a fave. Win-Win! 

I've intimated that all I've sewn are the 9-patches, but I have also made some home decor items. I will share all the details next time.

Happy Quilting, Friends!

Wednesday, May 20, 2020

Bound and Beautiful

I missed my goal of posting this yesterday, but here I am first thing this morning to share the final phase of my Dreamy Stars quilt. I did attach the binding on Monday as planned, but posting yesterday took a backseat to some fun I was having with the Frankfort Girls. We had a sewing day at Terry's. More about that another time.


Dreamy stars is now ready for use! There's a very good chance that this is going straight onto our bed. Those colors are so calming and restful, don't you think?


The binding is a part of the quilt-making process that some quilters detest. I would not be one of those, however. I rather enjoy this part, and I enjoy it even more now that I know to use a walking foot. I always used to have such awful problems with puckering. The culprit was my using the wrong presser foot. I also have gotten better at machine stitching the binding, and while I know it doesn't look all that consistent from the back, it looks fine on the front, and for most of my quilts I am perfectly satisfied. If I were making something really special, I would allow the extra time to stitch it down by hand for a more polished, pristine look on both the front and back.


The polka dot backing looks great with the two colors on the front. It is almost as if I planned for that gold star fabric to go with this backing. I did not however; it was a happy accident.


I could point out a few flaws with my new finish, but I don't think I will. I am more satisfied with all the goodness in this finish than I am disappointed in those minor flaws. I rarely make a quilt that is intended for contests or judging or competitions. I make them mostly for me. I take great joy in the making process; I anticipate the elation of finishing; most of all, I love feasting my eyes on those gorgeous end results. Flaws come with the process, and I am fine working with them, mostly.


One more look at Dreamy Stars on the bed; lovely, just lovely. I am so thrilled with this layout of the stars, and I have my friend Sharon to thank for it. In the very beginning, I could not decide how I wanted this to go together, so I sent her pictures and collages of different options under consideration. I sent this layout almost as more of an afterthought, actually. I was surprised when she said she liked it best; what a good decision! It is the perfect setting for the blocks. Thank you for your valuable input, Sweet Sharon!!

Speaking of Sharon, do you remember the sign board she gave me for Christmas? I hung it in the longarm room; here's a link to the post. Well, I changed out the saying. This will serve to inspire me for a month or two.


Happy Quilting, Friends!
Monday, May 18, 2020

Dreamy Stars Reveal

You'd best brace yourselves, readers, as I am revealing a totally finished quilt that took less than 3 weeks to construct. Feast your eyes on this beauty.


I shared the two fabrics in this post from April 30. I began making stars on May 1. Saturday afternoon, May 16, I finished the top construction, went straight to the ironing board for pressing and then - gasp - proceeded to the long arm machine. The photo above shows the pretty quilt top awaiting quilting.

Say, what?

Yes, I decided that I would just see what it feels like to finish a quilt in the same year as it was begun. *grin* I quilted it yesterday afternoon and evening. Today I will attach the binding.

I spread it out on the bed for some pics and I just love the look. I knew I liked these two prints together, and they came together beautifully in this simple, straight-set Ohio Star design.


The blocks finish at 10 inches. I have 8 blocks horizontally and 9 blocks vertically, for a total of 72 block. I opted for no borders, so it finishes at roughly 80 x 90 inches.


The backing is this sweet pin dot from Henry Glass & Co. I have an entire bolt of this backing, so many more quilts will be wearing it. The neutral will lend itself to many of the quilts I make, and I can't get over how easy it was to just roll out the needed amount, unfold it on the frame and load it in. I am going to be really glad to have this backing as my go-to.

I will use the blue from the quilt top as my binding. And as I said, I will do that today. I will share the backing and binding pics tomorrow.

Could this be the beginning of a new chapter in my quilting evolution? I'd like to think that I will get into the habit of moving from quilt top to quilted top with no lag-time. Gosh. What a goal.

It would be good for me to spend more time at the long arm. I get so rusty with my free-motion moves; if I were to spend extended time quilting, then my quilting would be more pleasing.

Still learning. Gosh.

Hope you are having an awesome Monday! Have a great week!

Happy Quilting, Friends!

Tuesday, May 5, 2020

Ohio Star Marathon

A few blocks are simply too perfect not to make in mass quantities. I have long sung the praises of the 9-patch and have countless quilts and quilt tops featuring it.

Another block that lends itself to all manner of fabrics, colors, and adaptations is Ohio Star. Again, it is a block I've used in dozens of quilts and never grow tired of it. That's a good thing, too, because I have undertaken a project that could possibly require 90 of them!

My runner husband and son would say "it's a marathon, not a sprint."


I have made a few of each color just because I wanted to see how they played together. I am loving the combination (see earlier post here) and now I am in the process of cutting all the parts for a marathon day of stitching hourglass units and then building the star blocks.


I need two sizes of blocks: for the hourglass blocks, I am cutting 4.5" squares. For the plain blocks, I am using 3.75" squares. This results is a block that is 10.5" unfinished. All that above is some of the cutting for blocks; I am sure I will be doing more. Does it surprise you when I admit that I have lost track of the count, and now I am just flying by the seat of my pants? (This is my norm.)


With the 4.5" blocks, I layer a white onto one of the colors, draw a diagonal on the wrong side, and stitch on either side of the line. This is old-school; so many machines have laser lights to mark the stitching line, while others follow a line on their machine table. I know this takes time, but this method works for me.

Of course, the two HSTs that come from the step above have to be turned into the hourglass block, so more drawing of diagonal lines is required.


At last, we get the sub-units, and we are good to go for the construction of the blocks.


I may come back soon with a more complete breakdown of making these units. It's pretty basic, but for any new or beginning quilters out there, the step-by-step might be useful.

I spent a good portion of yesterday cleaning in my sewing room. To look at it, one might not see any change, but anytime I came to something that was a scrap, I cut it into the units I have been amassing. And, when I came to anything that fell into the category of "mending," I actually DID it, then put it back where it belonged so it no longer cluttered up my space. Working this way doesn't show instant results. It will take days of very focused effort to improve the orderliness of this space.

Hope you are staying safe and doing something creative!
Happy Quilting, Friends!


Thursday, April 30, 2020

Deep Stash Dive

That desire to start a new project took hold of me yesterday, and this is what I reached for. At last a notion that has been floating around in my head would come to life. Literally years ago I put these two fabrics together with the idea that they would become a quilt using stars as the main design. To me they just look so dreamy together. The yellow Thimbleberries print called Lake Life (3.25 yards) and the blue 3 Sisters Shangri-La paisley (3 yards) would look great with a white/cream neutral added to them. It would be lovely.


It might be hard to see, but the date on the Lake Life selvage is 2012. I would venture that Shangri-La is of similar vintage. I am not kidding when I say that this has been a notion rattling around in my head for years.

I spent a lot of time deciding things. I mean a lot. The size of the stars. The style of the stars. The most efficient way to cut fabric. How to set the blocks together.

I made 4 Ohio Star blocks and laid them out on top of the blue which I pinned to the design wall.


 It wasn't much help in my 'seeing' the final quilt, so I went to a layout app on my phone. Here is a simulation of how a straight set would look.


Not bad, but I still had uncertainties. After waiting so long to use these fabrics, I want to get this right. I tried putting the blocks on point. That looks pretty good, don't you think? Below is another simulation.

Still unsure, I decided to make some blue stars to see how I'd like alternating blue and yellow stars.


I turned this picture into a simulated layout using that phone app and here's what we get.


So, this final layout is the one I think I want to go with. All the stars. All the blue and yellow dreaminess. So yes, this is it.

Whaddaya' think?

Happy Quilting, Friends!