Saturday, October 30, 2021

Fall/Winter Bed Pillow

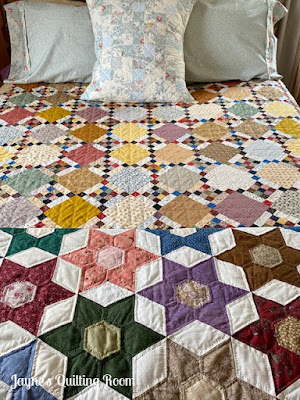
Still on my quest for bed pillows to complement the fall/winter mood of the quilts on our bed, I went to work piecing a new pillow cover to reflect that fall mood. As mentioned in the last post, I got the pillow cases done in quick order, so a day devoted to piecing and quilting this pillow cover was my next agenda item.

Below is what the bed looked like when I decided that new pillows were needed. The mixture of fall quilts with spring/summer pillows just didn't please me at all. There was never a doubt that I'd make a change. The fact that I did it so quickly surprises me, however. I generally ponder such decisions much longer.


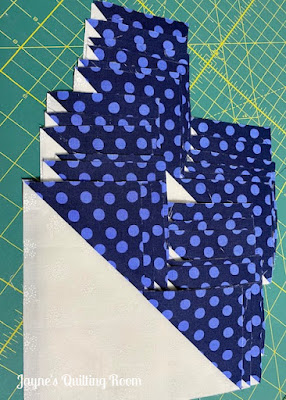
With the pillow cases in back finished, the throw pillow in front became my focus. It's 22 inches square and I have just one pattern for a quilt that size. I've made it twice before for this pillow form, and will likely use it for as long as this pillow form lasts, which may just be forever, since it only serves as decoration on our bed.

This is a super simple table topper design by Joanne Figuroa from about 10 years ago. It was a free down load from an online source, and I've looked repeatedly for a link to share, but none exists (too old!). I wrote about the pattern in this earlier blog post. My earlier two pillows using this pattern are also featured there.

I am still altering this pattern to suit me, as I figure I will continue using it. The original calls for all that neutral space to be made with 2.5-inch squares. I see no need for that, so I am going to mark my pattern with instructions with larger neutral cuts for a faster finish. Ah, but I digress...

The new fall-into-winter look on our bed pleases me immensely. There's just enough scrappiness yet cohesiveness to make it all work well, in my eyes, anyway.

A new look for the bedroom, and Gracie approves. *wink* And as a bonus, it's a new look that did not require hopping on Amazon to shop for new stuff, but rather, a dig through the fabric bins to make it myself. And I did it just as fast as Amazon. The pillow cases were just a couple of hours on Wednesday evening; the pillow cover took several hours on Thursday. By suppertime Thursday, all was done and pictures were snapped. 

Now, I have one more post to write regarding this little project - coming Monday or Tuesday - so come on back! And, I will be back to work on those blue Kaffe Fassett stars, too. *excited!*

Happy Quilting, Friends!


Friday, October 29, 2021

Fall Pillow Cases

I have put the blue Kaffe Fassett stars aside for a bit, as I decided on a whim to make new pillow cases for our bed.

I changed out the quilts this week, light blue shams and pillow covers just don't work with the darker colors in my fall quilts.

So I made new ones.

Tell me that you don't agree that fall pillows are needed. Of course! And when one has a closet full of fabrics that will likely never be entirely used for quilts, making pillow cases makes all the sense in the world.

Fabric diving is always a good way to kill an afternoon, so when I went digging around, I found plenty  of options. Here are the fabrics I used.

The light is by Brannock and Patek; the red is by Thimbleberries; the green is by Kansas Troubles. They are all similar vintage - 1997, I believe, is on the selvage of one of them. Gracious...

Ok, so you see that I made the pillow cases; and that leaves a pillow cover for that square pillow in front. That will be the subject of tomorrow's post! *wink*

Happy Quilting, Friends!


Tuesday, October 26, 2021

Assembly Line Piecing

One way the quilter has streamlined piecing is by employing an assembly line methods of quilt construction. Since I have begun working on the blue stars quilt, I've been looking for ways to make the units in as streamlined a way as possible.

By using the book I mentioned in the previous post, Patchwork Math by Lynn Wilder, I have my 12 blocks finished. Here are the simple steps.

In the previous post, I shared how I finished the corner square triangle units. This post shows the process of making flying geese, the points of which will be the points of the stars. I started by referencing the section of the book for no-waste flying geese. The picture above shows the first part of the process that I photographed. The actual starting point requires a large white-on-white square and 4 smaller squares which will yield 4 flying geese, enough for one star.

After pressing the blue sections open, the remaining squares will be added.

I needed to make star points for 7 stars; the parts for those very points are all ready for the next round of stitching.

And here are the finished flying geese units, all trimmed and ready to be sewn into stars. 

Ready to be joined to those flying geese are these parts - the center squares, and the corner square triangles. Now for the assembly line. I lined up all the star parts and stitched 'em up lickety-split.

I had 5 made earlier, individually. The last seven went together easy-peasy using the book and chain piecing.

These 12 stars will need to have 13 coordinating stars, and you can bet that I will be chain piecing those as well.

Happy Quilting, Friends!


Saturday, October 23, 2021

Stars of Blue

At the beginning of each year I make a goals list of quilts I most want to make by year's end. It's my quilter's version of new year's resolutions. The quilt I am working on now is from that goal's list, and it makes me very happy to be delving once again into the Kaffe Fassett tubs of fabrics.

For the longest time, this star and three others similar to it, lived on my design wall - like from January through June. Then my attention focused on our sew along, and then on Irish Chains, and all manner of other projects that crossed my radar. Here is a reference post from when I made the earlier blocks.

The "blue Kaffe" as I referred to it was never far from my heart, though, and this week I have returned to it with my entire focus! As excited as I was back in January to make this quilt, I sure have delayed in returning to it - 10 months!

The longer I spent away from this project, the more my angst grew concerning all the units needed for making more of these blocks. Sometimes, when I know there will be a lot of unit preparation, I tend to allow the task to become daunting. The units on the corners were particularly worrisome, as the measurements for all those smaller parts would be tricky. The units that make the star points are flying geese, and I knew I could locate directions for chain piecing those using a no-waste method, but still that was yet another 'chore' - it's like I expect these units to magically appear from my sewing machine or something. I definitely made it a bigger deal than it was. 


Lynn Wilder of Sew'n Wild Oaks blog came to my rescue. A purchase I made from her Etsy shop earlier this year included her book Patchwork Math. This handy workbook-style manual helps quilters figure sizes for units just like those needed on my star block. A title with the word 'math' in it doesn't seem like something I would ever buy, but most likely, Lynn wrote the book for quilters like me who have a general aversion to math.

With careful study and careful measuring and cutting, I am proud to report that the corner units have been completed successfully. 

I cut all the required pieces for 10 blocks, then proceeded to make just one set - the instructions make 4 at a time, which is nice since 4 are needed for each block. Once that trial effort was finished and measured accurately, I went about chaining the rest. Whew! finished like a dream!

I learned that this unit is called a Corner Square Triangle. The size I needed for my star blocks was a 3" square unit, and her example instructions were for that exact size - so I really didn't do any 'patchwork math' - but we will trust that I can do the required math next time, right?

I will be testing my formula conversion (math) with this next unit - flying geese, which is also covered in this book. My size does not match her example. Oh well, here we go! Wish me luck!

Happy Quilting, Friends!


Thursday, October 21, 2021

Another Quilt Off The Frame!

It appears I have turned a corner. The Tin Lizzie is becoming less and less intimidating all the time. After finishing the Harvest Pumpkin quilt earlier this month (click here for that post), I knew this quilt of roughly the same size would be up next for me. 

This scrappy churn dash quilt with 9-patches for centers was a well-aged quilt top made in 2016 at our Canter's Cave Retreat. The Frankfort Girls all had the option of making this pattern at the retreat. and I was happy to participate; I love my finished quilt top. The quilt is by designer Kim Diehl, called All In A Row. It has just 25 blocks (5x5), and is 60" square; with all the cutting done ahead of time, it made up fast at the retreat.

Ever since, it has hung in my closet with a gazillion other quilt tops waiting to be quilted. Well, except for the day I attempted to correct a wavy border issue - that aggravating effort made its way to a blog post, which you can read here.  

So, it came out of storage and is now quilted. I loaded it last Thursday and in just an afternoon, I took it from closet to loaded to quilted to trimmed. On Sunday afternoon, I attached the binding, and have been slowly stitching it in the evenings while watching television.

This looks like a scrap quilt, and perhaps some of these fabrics were scraps at the time I made it, but mostly I just pulled a wide variety of fat quarters for a very scrappy look. The sashing fabric is consistent as is the cornerstones, and the border. That helps contain the haphazard nature of each block.

When I was trying to decide what to use for the binding, I pulled a variety of red and burgundy leftover bindings out. I opted to sew them all together and have a scrappy binding to match the scrappy nature of the quilt center. Here are a couple of pictures of the backing and binding. If you need to take a closer peek, then you'll probably have to click on the pictures to enlarge.


Mostly, I have just one side remaining to be stitched, and part of another. It could be finished tonight while we watch the Browns on Thursday night football.

Next up for the long arm is the special request quilt for DD Emma. Remember that low volume Ohio Star she wanted? I know she is anxious to get it on her bed, so I am committed to riding this wave of long-arming confidence and getting it quilted ASAP.

Happy Quilting, Friends!


Wednesday, October 20, 2021

A Scrappy Rabbit Hole

 In a post from last week, I said, "Theoretically, all of these various strips and squares are separated into dedicated storage tubs or baskets. Truthfully, a lot of them are more-or-less stacked and simply corralled in a corner of my room." Click here to read the full post.

As I went about my day after tapping the 'publish' button, I found myself thinking about that corner with all my so-called organized squares and strips. I wondered just what kind of order I would find in that particular corner of the quilting room. As I said, theoretically, things were sorted - perhaps not neatly, but somewhat.

Oh gosh. What a rabbit hole. I had more of a mess on my hands than anything resembling order. You know how a simple task becomes an overwhelming JOB and you feel as though you've lost control? That's where this simple look-see took me. Golly.

The two containers in the picture above represent some of the corner's goodies. At the bottom of the picture a long bread basket contains 2.5 inch strips. That looks pretty neat, and besides the fact that the strips are toppling over the basket's sides, the organization is working pretty well.  Here's another view of the basket. 


That plastic tub, however, is an entirely different story. It contained stacks and piles of all manner of scraps. Maybe I toss things into it just to get it out of my sight? Like I would never have to deal with it if it couldn't be seen in my immediate line of sight? Ahem...

I know you want to investigate what all I found in this tub. I am not too proud to show you the mess - yes, I will share. 

These interesting blocks were among the buried treasures in that tub. I had to search back to 2017 to find the approximate date on which these were made. Claudia, my student from several years ago, had asked to learn about curved piecing, and this is from that day's lesson. 

Rather than just set them aside, I sewed some together, and now I need to figure out what I will do with them.


Three blocks with round centers. I have no idea how to proceed. So they join a ga-zillion other orphan blocks. I will show you that collection another day.

Moving on, this collection of related fabrics appeared. Check this post from last summer for details on the fabric and beginning the project. Check this post to see the finish. Shown in the picture was what was left over. Always the dilemma - what to do with leftovers!

I have a bunch of squares paired up for additional HSTs, and I really ought to go ahead and make them. I have no idea how they'd end up being used, but that would be a step in the direction of some sort of finish, right? 

For now, they are put aside while I think on it. Next up is a grouping of remaining orphan blocks and leftover bits from previous projects.

Besides these random blocks, I found a wide assortment of scrap fabric which I cut down into the prescribed sizes I have been cutting for weeks - strips and squares - and added them to the various tubs that are now actually pretty well organized by size, still in the corner of the sewing room.

I have talked a lot about scraps and controlling them, and when I read comments from followers, I see that I am not alone in realizing that controlling scraps is an ongoing concern for many a quilter. I love reading tips for managing the accumulation of scraps. Keep 'em coming!

Happy Quilting, Friends!


Tuesday, October 19, 2021

Gorgeous October

Most of us here in the Midwest US have had the most mild, warm and beautiful October. The days through the first half of the month were warmer than normal - almost hot, by my standards. Now, here just past month's midpoint, we are finally having what I would term "normal" October weather. Cool, crisp nights in the 40s and clear, sparkly days in the 70s. Perfect.

Here are some nature pictures (sorry, not quilts!) from our part of Ohio.


These two pictures were taken on a particularly warm late afternoon from our front porch. Note that the trees really haven't dropped too many leaves at this point. Our fall color seems delayed, and the leaves are now finally dropping - about 10 days since these pics were taken.

This past weekend we had our 4th annual Hocking Hills getaway with the kids. This has been such a fantastic way to spend family time - it is becoming a tradition we all look forward to! Here's a shot from our morning hike from Ash Cave to the fire tower - about 4 miles total.

Still not seeing much color here in Ohio, are we? But the Saturday morning was cool and the hike was refreshing. Those are my two daughters in the foreground; DH and SIL are further up the trail.

Last evening we drove into town for a couple of errands and admired this beautiful harvest sunset. Farmers are combining beans and corn, and the hazy dust stirred up by their machinery makes for a magical picture, despite our dirty windshield.

While we were away at Hocking Hills, neighbors in our home area were hit Friday night by a tornado. Our property was out of the path of the storm, but three miles away, several homes and outbuildings were damaged or destroyed. It wasn't a big tornado, but even small ones do damage. There was no loss of life or injuries, thankfully; rebuilding and inconvenience are the only lasting effects. 

I am expecting Sharon here in a little bit. What will we work on? Heaven only knows. We both are in that indecisive stage, I fear. I have at least three ideas brewing; we shall see what pans out.

Happy Quilting, Friends!


Monday, October 18, 2021

Three Finishes For Sharon


It always feels good to have a finish to share, and today I am sharing three recent finishes from Sharon. We have had our usual weekly sewing day the past three weeks, and on each of those days Sharon has finished a quilt. They are beautiful, of course, and I think you will be quite impressed.

The most recent finish is this gorgeous blue beauty. It is the Turning Twenty pattern which is a super-fast finish. Sharon had started it earlier and brought it to finish on Tuesday. Is this some dreamy loveliness or what!?!

The week before Turning Twenty, Sharon finished her version of Scrappy Irish Chain. You may recall that we worked on this pattern together - mine with bright yellow and hers with soft peach. Here is Sharon's finished quilt top.

The scrappy squares are largely leftover bits of various 3 Sisters fabrics which all work so well together, and of course the peachy-pink plays nicely with them, too. This is a simple quilt to make, yet we both felt that it was quite a ginormous undertaking, mostly because of the size. Those blocks are 18 inches and with all the seams in the pieced scrappy blocks, it is quite heavy.

And, if we go back a week before the Scrappy Irish Chain finish, we have Sharon's jelly roll challenge quilt which was finished in a snap. This was a fun quilt to work on (yes, I made one, too) and it broke the labor-intense focus on the Irish Chain. Sharon used more of her 3 Sisters stash to make this very gorgeous - and very simple - 9-patch and snowball quilt. I love the combination of those two blocks together. What a super finish.


We are getting stuff done around here, aren't we??? I love feeling so productive! It's funny how frequently our conversations always drift around to "what will we work on next?" That eagerness to start a new quilt never fades. Thankfully! I suppose all quilters do it to varying degrees.

What fun we have when we sew together, and we are finishing things! This weekly sewing date has worked out well for us.

Happy Quilting, Friends!