Monday, May 31, 2021

Sew Along Update - Week 14


I'm a little late to today's party, dear sewists, and I do apologize. I have been MIA here on the blog since returning home from our mini-vacation, and I still feel like I am playing catch-up.

But you're here for the sewing and quilting content, not my excuse making, so let's see what I can do about that!

A definite accomplishment since returning home from our tour of the South is starting yet another Spring Dreams quilt - this time using fabrics with a reproduction look. My stash is full-to-brimming with this style of prints, so it just seemed natural to give this a try.

In last week's update, I mentioned that I was considering making one more Spring Dreams using a Layer Cake of On Maple Lake by Pam Buda/Marcus Fabrics. I paired it with a random neutral I pulled from my stash. I have no clue as to when I bought this, but additional info on the selvage says Troy Corporation, Riverwoods Collection. Hmmm. The year of purchase remains unknown, but I have a lot of it, so it is the neutral in all the 9-patch blocks.

One thing most seasoned quilters know: Fabrics will play nicely with one another more often than not. We sometimes overthink the fabric choices we make. While I have had no training in design, I know that I don't want to put certain fabrics together, but if the "look" and the "style" are correct, then the outcome is likely to please. That has become my philosophy more and more as I work through my stash. 'Make it work'  is my prevailing mantra, as opposed to 'buy something to match.'

Now, a word about layer cakes. I do not have tons of experience with them, especially when I am cutting 2.5-inch squares from them. Theoretically from the 10" square, I should get 16. In the case of this layer cake, even with cutting on the scant side, I found it difficult to yield 16. I have some very small seam allowances. The photo below shows the very narrow seams from all three pieces cut from the layer cake. I hope this does not present problems down the road. I will be sure to address it here if I run into trouble.

While I am finding that the layer cake is slightly smaller than a full 10-inches square, a bonus to using a layer cake is that I have much more variety in my blocks. My prior Spring Dreams quilts were made either with yardage or jelly rolls, and that meant I used longer strips when making strip sets. With a layer cake, the strip sets are more plentiful and only 10" long. This variety has been fun to work with.

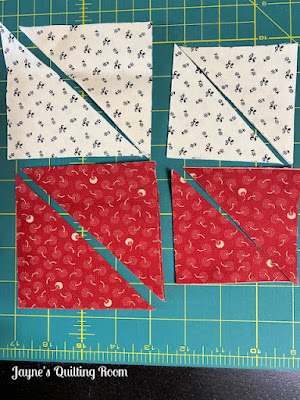
I have a time-saving tip. When cutting the units shown above, layer strip sets one on top of the other and cut in multiples. I trust myself to do three at a time. I worry about shifting or slippage if I try more. Be careful to line edges up and make the ends match. Use your fingers to feel the seams across the middle. As long as all this feels and looks spot on, then cutting the scant 2.5-inch strip set should be successful.

So there you have our week 14 update. Wow. Just 3 more weeks to go. On June 21, we will have a Spring Dreams Parade, so if any of you have made a Spring Dreams quilt with us, send pictures! Flimsy or fully-finished - or even 'work-in-progress' - let us share what you have created!

Have a great week, everyone!

Happy Quilting, Friends!


Thursday, May 27, 2021

The Intersection of Literary and Quilting

You may know that I am an avid reader. Fiction, nonfiction - I like just about all types. In the sweltering Ohio summer of 1988, I specifically recall reading The Prince of Tides (fiction) by Pat Conroy. Whoa. What a book. Prior to that, I'd read The Water is Wide (nonfiction) by Conroy. I don't think I put the two books together with the one author until some time later. Then even later, I read My Losing Season (nonfiction). All so very engaging and memorable; why, even to this day decades later, I can recall scenes from those books.

When we were on our whirlwind tour through the low country of the Carolinas, we found ourselves in pretty Beaufort, SC, fully engulfed in site seeing - gorgeous mansions, moss-strewn trees, historic markers around every corner. One little house seemed an unlikely one to catch my eye, but it did, and gosh, am I glad! It was the Pat Conroy Literary Center! OHMIGOSH! I made DH circle back to it so we could visit. What a treat!

We walked through liesurely, each of us drifting to items of interest. I turned into one room, and look at what was on the wall - a T-shirt quilt!

It looks to be a twin size, and features so many perfectly representative shirts from Conroy's life - both literary and otherwise. I snapped the picture and continued to browse through the vast collection of memorabilia - yearbooks, letters, family photographs, military honors, sports awards, and so much more. Some pieces of movie memorabilia were included as well - fascinating!

Then I came back through the central entry area, and saw this woman seated at the desk. I'd just seen her pictured in some of the memorabilia on display, so I felt confident she was a family member. Yep! Pat's sister Kathy! How totally awesome. We talked for a good little bit, and then I asked her about the quilt - you will NOT believe this - she is the one who made it!

So we talked a little longer. *smile* 

She told me that she is not a quilter, and had to figure out things. Like, most importantly, how to get words on shirts that were never shirts to begin with. She went to a screen printer and asked for discarded shirts or seconds, had them turned inside out to replicate the appearance of well-worn t-shirts, and then had the words applied as if they'd been t-shirts all along. Obviously, some items actually were t-shirts; Kathy's intention was to fill gaps in representing her brother's milestones and accomplishments.


Kathy shared one specific story about the '3' that you see above. I am sure I won't do the story justice, but it is one Pat apparently told many times, and one that kept him humble. I will  summarize as best as I can. He frequently told of the time he and his classmates were all receiving scores on some standardized tests they'd taken. He was a new kid in the school, and had not been fully accepted by his peers. His name was announced often with incredibly high scores in literacy, composition, and similar academic areas, while classmates' scores were much lower. Finally, scores for mechanical aptitude were announced, and Pat was nowhere near the top. In fact, he was in the 3rd percentile. THAT was what his classmates remembered about him! In his adulthood, he had an engraved '3' mounted near the front door of every house he lived in.

Great anecdote. I hope I remember it closely enough as to how Kathy told it; I wasn't taking notes, and I didn't jot down anything later. I hope my (feeble?) memory suffices!

Now to the quilt - for a first-ever quilt, Kathy has managed quite a remarkable effort here. I would never have thought to go about creating t-shirts the way she did. If you can click the picture for a closer look, you will see that the blocks are appliqued with zig-zag stitches to the blue background. It's just ingenious how she "figured it out." I commend her for her creativity! And what a great tribute to her brother's life and accomplishments. Wonderful.

I've spent time since the visit perusing the internet for nuggets about Conroy who died of pancreatic cancer in 2016. He has many more books that I need to investigate. I can also see myself re-reading those three I mentioned, especially The Water is Wide. Maybe I will also queue up some of the movies made of his books. I'm sorta' wishing I'd bought at least one book at the Literary Center.

Literary interests and quilting interests intersect here today, readers, and I am thrilled about it. What a great vacation memory.

Happy Quilting, Friends!


Monday, May 24, 2021

Sew Along Update - Week 13


We've tiptoed through the tulips, made our way through the April showers, enjoyed the May flowers, and it won't be long before we tumble headlong into June! Cliches galore, there! *grin* 

So, since we last checked in, what have you been able to accomplish on your Spring Dreams quilt? Making blocks? Setting together rows? Planning for quilting?

My journey on this sew along currently has me thinking about two things from opposite ends of the quilting spectrum. One is starting a new Spring Dreams; the other is quilting one of my existing Spring Dreams. Yes, I would most definitely make another one of these quilts. And yes, finishing one would be a really big deal for me.

Maybe I can do both! 

As far as starting another Spring Dreams goes, it occurred to me last week that we have not made one to represent the reproduction lovers in the quilting family. It would be worth a try to see how one would look done up in fabrics that hearken back to days gone by. It just so happens that I've got a little bit of that. *grin*

All my previous Spring Dreams quilts have been made with yardage cut into long 2.5" strips or jelly rolls, which are precut 2.5" strips. I wonder how I would get along using a layer cake? I have this older LC of some Pam Buda fabric that might just provide the repro look I am going for.

 Since the LC is mostly darker fabrics, I found the light yardage in my stash for the light part of the 9-patches. I also pulled out the dark yardage to use as sashing strips. 

I really do think I want to make this quilt. I intend to give it a go here in the coming days. Stay tuned for updates.

Now, as for quilting, this requires backing, so I spent a good afternoon or more digging out yardages that would suit either my original Spring Dreams or my Sanctuary Spring Dreams. Of course I want to show you both! I can't yet decide which one I will ultimately end up quilting.

For my original Spring Dreams quilt, I found these greens that seem to do the job. The paisley is the one I have the most of, but it is still a tad too small to complete the job. Therefore I need to piece the backing, which necessitates my adding that green floral. I have only about a yard of it - maybe not even that much, but it would be enough to back the quilt. The paisley is Windham Fabrics piece by Anna Griffin. The floral is so old there is no way of knowing it's origins.

I'm especially interested in  quilting the Sanctuary Spring Dreams. Since making my new bed pillows this past week using bits of leftover Sanctuary fabrics, this would be a lovely quilt with which to complete the look.

Both the pink fabrics I pulled are by 3 Sisters, the same designers who are responsible for Sanctuary. I have lots of the paisley, but I like the floral a lot, too, so I am considering yet another pieced backing for this quilt, too. 

So that is my update for this week. Make this new week a great one, dear quilters!

Happy Quilting, Friends!


Sunday, May 23, 2021

Slow Vacation Stitching

Do you take quilting with you when you go away on vacation? I do. I just have to have something that I can work on to fill travel time or evenings in hotel rooms.

Sometimes, I obsess about what to bring along, and end up packing way more than I could or would ever do. This time, I kept it super simple. I just grabbed my little Longaberger basket of Lake Effect applique and popped it in the car. I made sure I had extra needles, beeswax, thread, scissors, and the applique panel; nothing else needed. Perfect traveling companion.

I'm not getting great amounts of stitching done, but bit by bit it makes a difference.

So where are we, you ask??

We left Friday morning and turned the car South - as in South Carolina and Georgia, specifically. We are doing a whirlwind drive through Columbia, Charleston, Savannah, among other locales. We are staying off the interstates as much as possible, and seeing communities, small towns, farms, interesting things that one doesn't see on a super-highway. And we will only be gone about 5 days, so whirlwind is definitely the operative word here. We aren't scheduling anything and are just going where we find something interesting.

Happy Quilting, Friends! I am linking with Kathy for her Slow Sunday Stitching party.


Friday, May 21, 2021

Another Wedding Quilt

I'm making up for lost time on this particular wedding quilt. You see, the wedding was in 2019. I am only a year and a half tardy in gifting. Good grief.

Meet the Everhart Weathervane quilt. You saw snippets of it here when I was stitching the binding. I wanted to wait until that was done to show the full reveal. The quilt is one I've had on the to-do list for a very, very long time. As these various fabrics began coming together - quite by accident - the idea to make the quilt with them solidified, and in 2019 I made the top

Finally, it is quilted, bound, wrapped and ready to deliver to Seth's parents for eventual delivery to the couple. 

Here are some more views of the quilt.


I admit that practice on the long arm is paying dividends. Each quilt I finish moves me closer to a comfort zone. My confidence with my free motion quilting is growing, and I'm 'listening' to the machine. It is very similar to the regular sewing machine in that a new or different sound is an indication of something - a bobbin running low or another thread issue of some sort. There's also a 'feel' that the machine affords and I'm learning to be attuned to that, as well.

Here are some closeups of the quilt while it was on the long arm. I like studying these to see how my meander stitching looks, and how I might improve it.


So, yes, practice is the game-changer, and I am becoming more willing to get right back to it and put another quilt on. Basically, every single one is practice, and Lord knows I have a few quilt tops hanging around needing quilted. Practicing over here for the foreseeable future, right?

Happy Quilting, Friends!


Thursday, May 20, 2021

New Pillows!

Every now and then I take a notion to spruce up some space around the house. An area that has bugged me recently has been the decorative pillows on our bed. Two-three years ago, I made all the pillow coverings and at the time, I was very happy with them. But you know how we tire of things, right? Well, this look had lost its appeal.

The pieced pillow in front was a rush job I made one afternoon. I put little effort into it, minimal quilting, loosely fitted, and so-so construction. It basically got the job done. Period. The two pillows behind have vintage pillow cases on them, found in a sale room at a quilt show several years ago. I was thrilled to find them but they, too, were far too big for the pillows and looked sloppy on the bed.

On Tuesday when I was sewing with Sharon, I worked on making new pillow covers for all three pillows. Took me all day, too, as I finished them up late that night.


I am so pleased with this new look. I did a much more professional job on the pieced pillow cover - it is much more fully quilted and fits the pillow properly. Definitely a neater look. The pillow shams in back are made with three of the same fabrics used in the front pillow, and the overall look of the three pillows together is so much more cohesive, in my opinion.

The closeup view of the pillow case shows some of my fabrics rather well. The cuff fabric is brand new - some leftover Sanctuary from my recent Spring Dreams quilt. The trim is called Barefoot Roses by Tanya Whelan - from heaven knows how many years ago. And the body of the pillow case is an equally vintage fabric called Birds by 3 Sisters/Moda. 


The new pillows are not meant to "match" the quilt, but they do not "fight" with each other the way the previous pillow covers did. These new ones are more a complement of the quilt. 

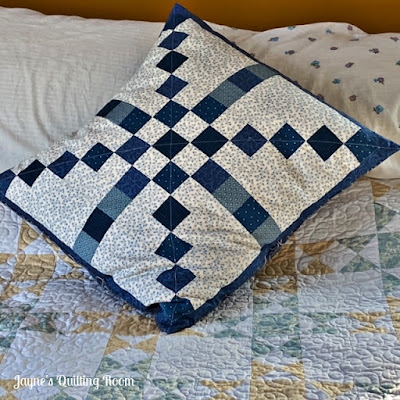
The pieced pillow in front was what took most of my day. Selecting the fabrics, making minor alterations to the pattern, quilting - took a good bit of time.

Explaining the pattern for the pieced pillow could get involved, but I will try. 

I have a habit of printing patterns off the internet - freebies, of course. I have notebooks full of them in the quilting room. When I need a pattern, I peruse the notebooks (it's a lovely way to while away an afternoon!). This one, Starburst, says it was designed by Joanna Figeuroa and Moda, but I have had no luck locating it on either of their websites. Since I did discover that the fabric used in the illustration came out in 2012, I have to assume that is also when this pattern was issued. Perhaps it has been retired to the vault of old patterns, no longer available. 

Anyway, I used a pattern for a 22" table topper called Starburst. Why not use it for a 22" pillow cover, too? Works for me. Both times. I changed a bit of the construction. Instead of cutting and sewing a whole bunch of 2.5" background squares, I calculated and cut for larger pieces getting the same result.

No doubt about the design on my original version!

The first pillow cover shows the design quite clearly; this newer version not so much. And I don't mind that. I like that it is subdued and calm. Exactly the feel I wanted.

The new version is subtle and understated.

I am satisfied with the new bedroom look. If I could do more and had a big budget, painting and new flooring would be involved, but that isn't on my radar any time soon. This freshened-up look suits for the time being.

Happy Quilting, Friends!


Wednesday, May 19, 2021

Serene Sewing


I couldn't help but plug that word 'serene' into today's title. Sharon used it to describe the quilt she was working on, and nothing could be more apt. She has a fast and simple quilt that is quite a beauty in its total understatement.

These two-color quilts are just so addicting. We made those Double Irish Chains a few weeks ago, and then Sharon stayed with that two-color idea and began this version using 9-patches. Serene, indeed. The last time we sewed together, she pulled this blue out of my tub of solids.


With very little stitching time since then, she already has a quilt top finished. Quilts can be simple to construct, but striking in impact. This lap-size quilt is 8 x 8 rows. Sharon was running out of white and went as far as it would take her. 

Serene and calm. The shade of this blue almost whispers you to sleep. The construction is as basic as can be: 2.5-inch squares for the 9-patch blocks, making a 6.5-inch unfinished block. Then set together with 6.5-inch setting squares - presto! A great, satisfying finish!

I worked on making pillow cases and a pieced pillow cover for our bed. That will be the topic of tomorrow's post.

Happy Quilting, Friends!


Tuesday, May 18, 2021

Tutorial - 4-Patch Scrappy Quilt

Several dear readers have reached out to me in recent days requesting information on how I made my 4-Patch Scrappy Quilt. Sure makes a quilter feel good to know people want replicate something like this. I truly just played with squares and triangles until I found a block that pleased me.

 I figured it would make sense to whip up a little tutorial for readers. If you have a significant scrap overflow, and are like me - unable to throw any of it away, then you will like this, I think.

Actually, I did a post a year ago March in which I explained how I made the block for this quilt. It is just one block, with two colorways to provide the hourglass effect where they meet.

This post and the scrap challenge described therein came just before the world shut down with the pandemic. Covid changed plans for quite a lot of folks, and while I have more or less done a lot of other things throughout this last year, I always knew I would find a way back to my Scrappy 4-Patch.

Click that link above for precise directions, or follow this summing up, if you prefer.

The inner 4-patch unit is made with 2-inch squares. All the squares in this quilt are from a bin full of 2-inch scraps that I add to all the time. Once constructed, the 4-patches should measure 3.5 inches.


The interior triangles are made with 3.25-inch squares cut once on the diagonal. One block requires 2 squares cut this way. Originally, I finger-pressed the center of the triangles and lined that crease up with the seam on the 4-patch. After awhile, though, I became dissatisfied with the way the edges were so haphazard. Even being super-careful, I think finger pressing distorted the bias. I found better results with this method: center the point of the triangle on the 4-patch. 


I generally work in batches of 8 or 10 at a time, chain piecing so I don't waste time or thread stopping and starting with every seam. I put triangles on two opposite sides, press, then add the triangles to the other sides. Press again when the batch is finished and trim to 4.75 inches. Use the marks on your ruler to assure that you are saving the necessary quarter-inch seam allowance all around.

The outer triangles are made with 4-inch squares cut once on the diagonal. Continue working in small batches applying the triangles, pressing and trimming in the same manner.


Finished, trimmed blocks should measure 6.5 inches. My quilt requires 84 blocks with red inner/white out triangles, and 84 white inner/red outer triangles, for a total of 168 blocks. Working in batches makes this seem doable. That's just my preference, however.

The "summing up" was more than a little involved. Maybe you can follow this well enough, or perhaps you'd be wise to click back to that original post mentioned above. *smiles*

Stitch those blocks together - my quilt is 12 rows wide by 14 rows long. I recommend taking the time to pin each intersection, and while not all of my points meet up properly, most do and for a scrap quilt, I am more than satisfied.

Hope this helps any of you who might want to make this quilt. Even though it took me over a year to complete the top, I am so very pleased with the effort.

Happy Quilting, Friends!