Wednesday, July 17, 2019
Bedroom Redecorating
This house is full of bedrooms that are no longer used by kids, consequently they get rather junked up over time. I have a hard time throwing out and/or giving away, so the clutter factor has become concerning.
I say "full of bedrooms" - I actually mean just two. This is a 4-bedroom house; one is our master bedroom and one is my quilting room. The two remaining bedrooms are the ones needing sorted out and having order restored.
One bedroom, which our youngest Emma vacated, has an antique iron bed that has some sentimental attachment. It was given to my parents from my paternal grandparents (it was used from their house). I slept in it as a girl. It came with me when we married in 1979. And it was Emma's bed since the time she outgrew her crib. It was originally green, but was a chippy mess, so sometime in the 80s, we painted it white. Now it is becoming a chippy mess again, but that's another project for another day.
With the goal of bedroom re-do in mind as far back as April, I bought a bolt of ticking fabric when our local Ben Franklin announced it was going out of business. A light-bulb moment struck and I just knew that I could make some wonderful bedroom accessories with it. And wouldn't ticking look great on that iron bed?!!? At half-off, this had 'perfect scenario' written all over it.
Having never made a bedspread before, I have spent a couple months mulling over my stitching plans. I knew I wanted the sides to hang down to the floor and to be loosely gathered. I needed to leave the corners open for the footboard to be seen. I wondered how to minimize the raveling. All the mental work has been ongoing, and this month, I finally cut into the ticking and began the real work of constructing a bedspread.
By the time I took the picture above I had already completed several steps. Since the width of fabric (WOF) was not enough to cover the top of the bed, I added about 6 inches on each side. That took care of the top. Then I had to create the sides. I suppose there are formulas out there for determining how much extra fabric is needed when creating gathers, but I made up my own. I used two full WOF sections and a part of one more for each side. The bottom panel is two WOF sections. I measured and marked for the quarter-points and half-points. I gathered by zigzagging over heavy thread. I was able to reuse the same heavy thread for all three sides. (I remembered seeing Lynette Jensen of Thimbleberries use this gathering technique in one of her old books from the 90s.)
I worked side-side-bottom to make and attach the gathered skirts. I should add that I zigzagged each raw edge and turned under quarter-inches where hems would later be going.
This picture shows one side sewn on. I like how it looks, and with some pressing and a hem, it will turn out just as I'd imagined in my mental images.
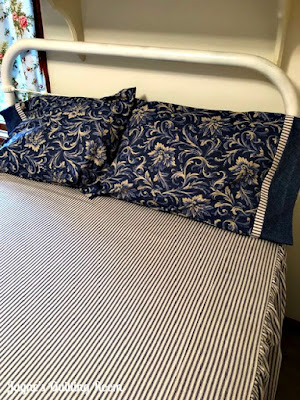
Ta-da!! The finish! I am really happy with how the bedspread turned out. I will continue to "style" this space in the coming days, and having such good results with the bedspread will surely keep me focused and motivated.
I finished the bedspread yesterday afternoon, and on a whim decided that I ought to make some pillow shams to complete the look. So I did! It took me longer to shop my stash for these fabrics than it did to make the shams.
Not seen in any of these pictures is the messy off-camera stuff still in this room that needs clearing out. I have a nightstand that I will add. I will declutter a little bit from those shelves above the bed. I will add more pillows. And the big job: making a slipcover for an old chair. Hopefully by summer's end, I can show you the entire room.
Happy Quilting, Friends!
Subscribe to:
Post Comments (Atom)


Love the ticking! It's perfect for the iron bed. Great job!
ReplyDeleteGood job, great way to give the old bed a new look.
ReplyDeleteI like it! Matches the bed frame style AND the pillows really pull it off! Now to make a small coverlet for the foot of the bed that matches the pillows! It is a WOW
ReplyDeletethe ticking was perfect for the bed style. But your shopping the stash was worth the time. Pillows are definitely the thing that makes it all pop.
ReplyDeleteWhat a great project, it looks wonderful and I am happy you gave your method of DIY for any of us that might want to give it a try.
ReplyDeleteit is great to spruce up our surroundings every so often. Happy Sewing from Iowa