
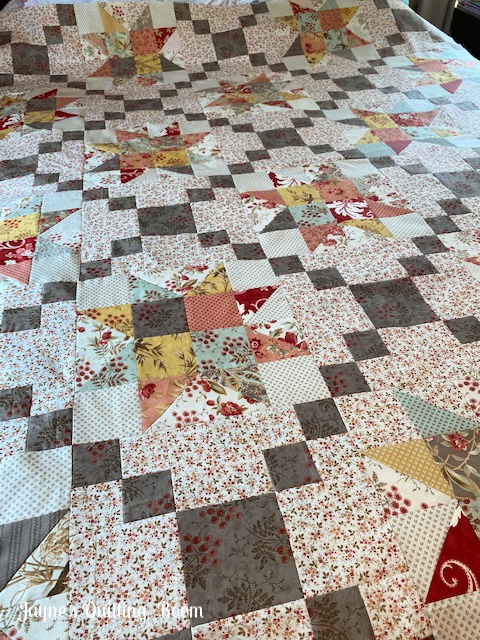
Back a few weeks ago I finished a quilt I called Larkspur Stars made with my stash of Larkspur fabrics. I did not have a pattern, and did what I seem to do more often than not - I made something up.
Go figure.
Here's the quilt, in case you missed it. And here is a link you can click back on.
I had some interest from a couple of readers about making the stars for this quilt, the sizes and so forth. This tutorial will answer those questions. (The setting blocks are pretty basic stepping stones blocks, and can be easily found in most any quilt pattern book.)
This star block measures 12" - which means you won't have to make too many in order to have enough for a quilt, especially if you use setting blocks.

With my Larkspur stars, I wanted to be as random as could be with all the prints, both feature prints and background prints. I had one charm pack and a few fat quarters from which to make the stars. My goal was as little waste as possible - but, I try for that goal with about all my quilts, honestly.
Here is my sketch for the block. The essential numbers to remember are scribbled around the drawing.

For the solid square units, cut 4 for your center at 3.5".
Cut 4 squares of background at 3.5".

For the HSTs, cut 4 colors at 3 7/8" and 4 background at 3 7/8".
Place one color and one background right sides together , draw a diagonal line. Stitch a quarter inch on either side of the line, cut, trim, press. These HSTs should be right at 3.5", but just in case, trim if necessary. It makes a big difference, so I take the time to do this.


At this point, I lay out my block to see how it looks. If I want more variety in my color placement, this is the time to change things out. For my demonstration star, I am using just a few purple fabrics, so I am not concerned with variety.

Now, the sub-units are prepared, and we move on to constructing the block. I typically would approach this with a chain-piecing mentality. Sew column 1 to column 2, then add column 3, then add column 4. However, I found that I more frequently ended up with sloppy intersections, so I moved to a different method which I now prefer. Make each quarter-block unit, shown below.

After pressing, I lay them out again to be sure all color placement is correct. I now attach the two top pieces, paying very close attention to pinning my intersection where the HSTs meet. Do likewise with the bottom two pieces.

Yes, I am a pinner. I want my points to come out as near-perfect as possible. I don't always achieve this, but I am achieving it more frequently with this construction method.

I line those seams up as perfectly as possible. I check the intersections of the two HSTs. I pin on each side of the intersection to eliminate unwanted moving or slipping. Like I said, most of the time I get it right; not all. The next two pictures illustrate this point for me.
 |
| Spot on!! |
 |
| Ehhh, not so much. |
I left it. It might have warranted another try, but I am not too bothered. It won't be visible in the midst of a big quilt, right?

The rest is self-explanatory - sew the top half to the bottom half. Again, take care to pin where those HSTs meet. I take the time to pin the center intersection, also. I want this right! Pin!

There you have it. My Larkspur star block. As I look at these two side intersections, I am pretty happy. I got 3 of 4 pretty darn perfect. Scroll back up to the top to inspect the block using the Larkspur fabric. Those intersections look alright, too.
I hope this is helpful for you. Let me know if you have good luck with making this star. It is definitely an easy one, no doubt. I might go on from here with this block and see what I end up with. Who knows!?
Happy Quilting, Friends!

This is such a pretty quilt. Looking forward to seeing how you quilt her!
ReplyDeleteJayne, I thank you for this tutorial. I have written you about loving this quilt. What size did it end up being, and did you border it. I do not recall seeing a photo of the whole quilt. If you have given this info before, I apologize.
ReplyDelete